Showing posts with label gifts. Show all posts

Gardenia Flower Hair Bow Craft

While the girls are sleeping, I wanted to get this post out.
I had a few requests for a tutorial on this style of bow. Since I can't do korker bows right now I have found a new hair bow that I am enjoying. I call it my Gardenia bows. To me it looks like some Gardenia flowers I have seen. What is ironic is that I am allergic to Gardenias. I can still appreciate their beauty.
Gardenia Crown Flower Bow Craft for the hair
Favorite Gardenia Flower Bow, so far.

Flower Hair Bow Craft
1st Attempt of a Gardenia flower hairbow.
The first one I made I gave as a gift attached to the bow holder I made as a birthday present. It was the favorite of several of the birthday guests as well as others who saw my post.  Now each time I make it I learn something new.

Materials:
  • Ribbon (You can use almost any size)
    • For the 2 outer bottom layers I used 5/8" ribbon.
    • For the 2 top inner layers I used 3/8" ribbon.
  • Circle for the center anchor piece (felt, foam, use your imagination)
    • A peace symbol foamie from a bag I got on clearance at Michaels.
  • Scissors
  • Flame/Heat source to seal the end of the ribbons you cut (I use a lighter.)
  • Glue (Using a hot glue gun works best for me.)
  • Embelishment of choice for the center (A crystal like gem looks nice.)
  • Preferred type of hair accessory to attach the bow. (I use a ribbon covered single prong metal hair clip.)
Step 1. Cut 8 ribbons for each layer. Start with the largest ribbon for the outer layer. I chose to start with 4 inches.
cutting ribbon for creating hair bow
Cutting 4 inch length of 5/8" ribbon
Step 2. Heat seal the ribbon on the ends to keep them from fraying.

Step 3. Take your first 4 inch ribbon, put a dab of glue on the top bottom piece of the ribbon, create a loop and glue just the bottom ends together. The loop is like those remembrance ribbons, just don't leave any tail. Maybe if I say it is half of an infinity symbol? Not quite sure how to explain it. I hope the pictures help.
ribbon for flower bow
The loop to glue. Looks like a cone with shorter ribbon.
Step 4. Attach each loop at the end onto the top of the circle. Placing each loop across from the other making a cross pattern. Each set of 4 loops makes a square or cross. The first layer is 8 loops.

ribbon loops for layer of flower bow
1st cross pattern of 1st layer of ribbons.

Finish 1st bottom layer of bow filling in the gaps.
If you turn your creation upside down it looks like a flower too.

foam circle used at center of ribbon loops
Upside down, bottom view of the bow with loops attached to foam circle.
Step 5. After your first set of 8 ribbon loops creating the bottom layer, repeat each layer using smaller ribbon loops. My 1st attempt, picture above, I only did 1 complete layer of 8 ribbons and only 4 ribbons on the top/last layer.

You can experiment with lengths and widths of the ribbon. With this purple/yellow Gardenia flower bow below, both layers are the same size length, 4". The purple ribbon is 7/8" ribbon.
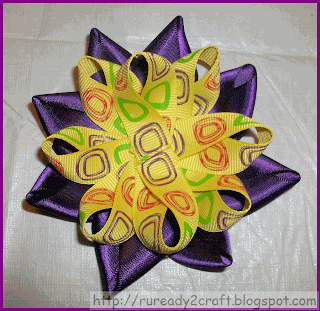
layers of looped ribbon for flower bow craft
7/8" purple ribbon 4" long, 5/8" yellow ribbon 4" long.
Step 6. I suggest your last layer be with 3/8" ribbon, it really looks good like the bow below.
Purple Gardenia Flower Hair Bow handmade
Purple Gardenia Flower Hair Bow.
If you stay with the 5/8" size you may not want to do as many layers. I wasn't thrilled with the outcome of the pink ribbon flower below. It is one I would like to change. I don't like the last layer of the 5/8" ribbon. The pink one was the 2nd one I had ever made, so I learned to use the 3/8" ribbon for the last layer like in the blue and purple ones above.
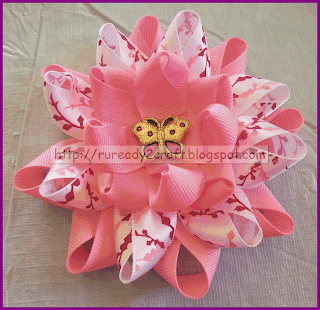
Gardenia flower bow craft
Least favorite Gardenia flower craft bow.
Step 7. Place chosen embelishment in center of flower. My daughters always pick the embellishments for the middles.
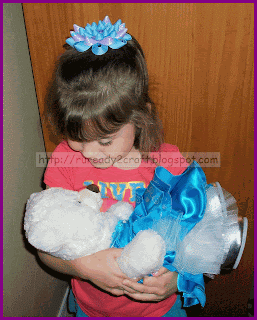
homemade Gardenia flower hair accessory
Almost looks like a crown for a princess!
Step 8. Attach Gardenia flower to the hair accessory of your choice. I attached it to a single prong metal hair clip.
Blue Gardenia Flower Crown Hair Bow craft
Handcrafted Blue Gardenia Flower Hair Bow.
After wearing it a few times, it seems that others seem to think it looks like a crown on my daughters head. So maybe I should call it a Crown Flower Bow. What do you think I should call it?

I am linking up to these craft parties!


Birthday Bow Holder Present

Continuing on my adventure into the DIY crafting world, I decided to make a bow holder. I have been busy making bows for my daughters and even created some as an inexpensive and unique birthday present for my daughter’s classmate. My newfound tolerance of crafting has turned into a new hobby and my very own blog about my adventures in the craft world. I got the idea to make bows, hairclips and a bow holder from a friend, Leah Mims, in Tucson, who has turned her hobby into a little business. She gave my daughters each a bow holder and bows at their Adoption Day party in April 2009. She has talent I can only aspire to.

My 1st crafts, A.D. (after dependents), were hair clips. I started by just covering hair clips with ribbon, getting used to using a hot glue gun, and attaching all the ribbon and non-slip grips. Another one of my friends, Amanda, is the one who told me about using the shelf liner as non-slip grips for hair clip. I use some purple shelf liner I found on clearance.
Still learning not 2 use so much glue.
Anywho, I thought I'd make the birthday girl a bow holder for all the hair clips I made for her. When I called to RSVP for the party, I found out from the birthday girl's Mom that her favorite color is purple. I chose a butterfly theme since most little girls like butterflies. Hence, why my current craft table cover has butterflies.

Supplies Needed:
  • wood plaque
  • wooden ‘smile’ - these would be fun as personalized name holders too!
  • large butterfly for the corner and/or other embellishments of choice
  • butterfly ribbon or ribbon complementary to your theme
  • acrylic paint
  • glitter paint - I found the purple one in the clearance section at Wal-Mart!
  • Optional: staple gun
  • Optional: I bought a purple brush and comb with holes on the end to hang from nails on the holder.
Did I mention that Michael’s has become my new favorite store?! I purchased most of the above supplies from there. It has become habit to always check the clearance aisle at Michael’s for frugal & fun finds. The dew drop stickers I used for the end of the nails were found there. They were marked 49 cents, but they rang up as 1 cent- Woo Hoo, gotta love a bargain!
How to make this Bow Holder:
  1. Paint the whole wood base the color of your choice as well as on the edges. Ours is a lilac color. Let that dry thoroughly.
  2. Paint the top with the purple glitter paint or another color of choice.
  3. Repeat with as many coats of the glitter paint needed in order to get an even color.
  4. Nail or hot glue the word on. We chose 'smile.' I did both because I wasn't sure how secure it would be with just glue.
  5. Glued 2 pieces of 10 inches of the butterfly ribbon together, back to back, so that the pattern was on both sides.
  6. With the ribbon, created a loop, like those 'awareness' ribbons and glued it to the back of the plaque.
  7. Cut three more pieces of ribbon to hang from the back of the plaque, approx. 2 ft. in length. Glued them to the back of the board with the pattern facing out.
  8. Optional: Once the glue for the ribbons on the back were dry, stapled the ribbons on the plaque. I wasn't going to let dried out glue ruin the holder months or years from now. 
  9. Optional: Printed out a 2 X 4 label that said, "Handmade for you from Hey May 2012" with my daughter's picture. I adhered it to the back.
  10. Optional: Measured equal distance from the ends and hammered two nails on the front of the plaque. Took dew drop stickers and adhered them to the nail heads.
  11. Adhere any embellishments you would like to decorate the plaque with.
  12. At the bottom of the 3 hanging ribbons I used the butterfly embellishments to weigh down the ends. 
There certainly should be plenty of room for bows! 
Additional Notes:
  • The one thing I would have changed was how I nailed the ‘smile’ to the plaque. I wanted it secure, but should have used finishing nails. I also should have placed the nails where they wouldn’t be so obvious. Each time I make one of these I am sure I will get better at it.
  • When I make hangers for bow holders in the future, I plan to use either a regular picture holder, two-sided ribbon, or solid colored ribbon; the ribbon I used only had print on one side. I ended up gluing two pieces together so the pattern would be on both sides. Since this wood was larger and heavier, I should have used a regular picture hanger. Next time around I will be better prepared!
  • I don’t think I would use such a large heavy piece of wood for the base next time unless I was prepared to do wooden dowels for hooks and use a picture hanger. I wanted to put a wooden butterfly on the base, but due to the size and shape couldn’t find a reasonable priced base for it. I didn’t want to spend a fortune. I have some ideas for my next bow holder that I think I will like better.
It was quite the adventure and learning experience. I learned there is a Hobby Lobby store opening in our town soon and am so excited to see what journey that store may bring!